A Beginner’s Guide to Using Kazeta

There’s a renaissance in the return to physical media. Are you, dear reader, also getting fatigued by digital subscription services, and would rather physically own your games in the palm of your hand? Are you also concerned with big-name publishers suddenly delisting some of your favorite titles from digital storefronts, without any way to get them back? Then look no further: Kazeta has got you covered.
Kazeta Definition⌗
So, firstly, what is Kazeta? After all, “Kazeta” isn’t exactly a word that you hear every day. The word “Kazeta” is Czech for “cassette”. You could also think of it being translated as “cartridge”. That’s the purpose of Kazeta: it’s an operating system that you can install on your computer, create your own “cartridges” using physical media, and replicate the simplicity of the way video game consoles worked in the 80s and 90s: just plug in your cartridge, turn the computer on, and play.
If you’ve ever used ChimeraOS, you’ll be happy to know Kazeta is developed by the same person: Alesh Slovak. dash from The Bryant Review did an interview with him – be sure to check it out for a more detailed behind-the-scenes look as to why Kazeta was made!
Why Kazeta?⌗
There are many preservation projects out there that are trying to “revive” the physical era of gaming. Field-programmable gate array (FPGA) consoles, such as the Analogue 3D and the SuperStation One, are noble attempts to bring retro consoles back-to-life with more modern features. But these are expensive, and if you don’t own the original cartridges for your older systems, buying them through third-party retailers such as eBay is going to cost you another small fortune. Oftentimes you are also locked to a small handful of platforms that the console supports. So you typically wouldn’t have access to PC games.
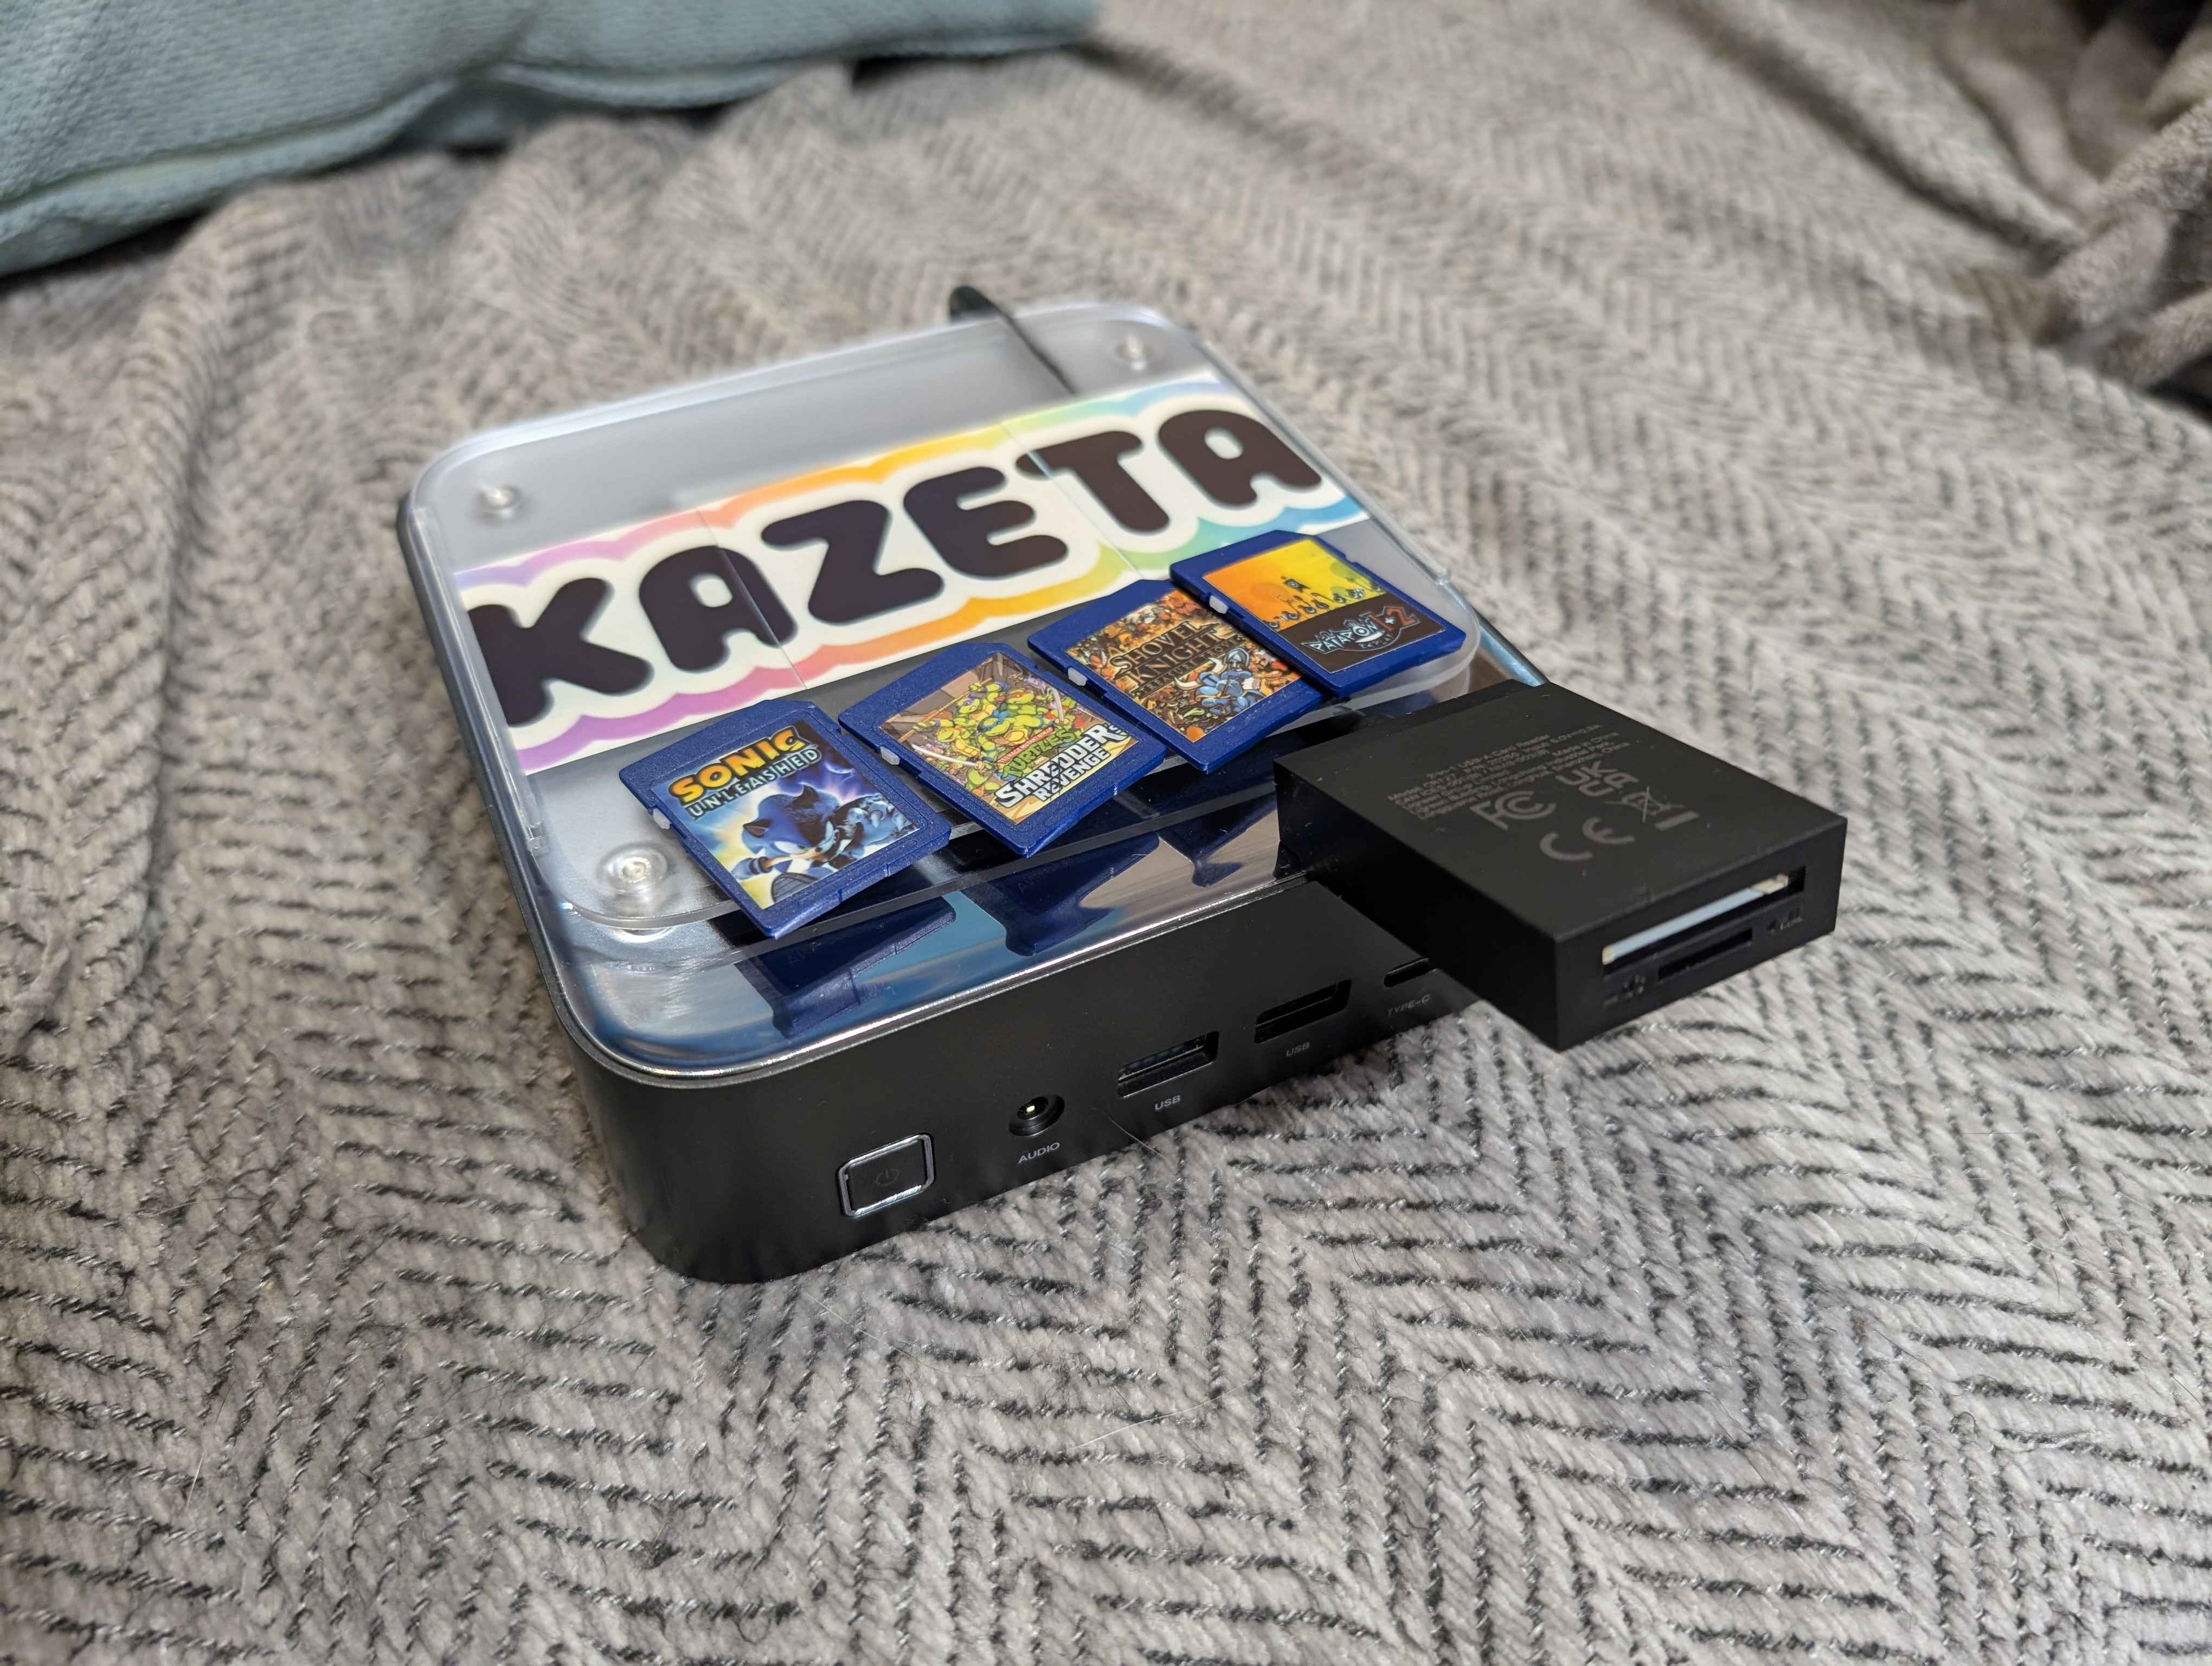 Image credit: InLineR from the Kazeta Discord
Kazeta sort of “bridges” this gap. Kazeta can emulate some of your favorite consoles of all time, such as the Nintendo 64, Sega Genesis/Mega Drive, and Nintendo Entertainment System (NES), while still giving you that sense of physical ownership – by means of putting your games and ROMs on external media, such as SD cards and USB flash drives. (This is assuming, of course, that you own the original cartridges and have dumped them by whatever means necessary.) You also have the benefit of running native Linux games, or Windows games via the Windows runtime. Kazeta can also make use of your existing hardware; you don’t have to buy a dedicated device for this. You can use any PC you have lying around and turn it into a console-like machine.
Pros and Cons⌗
As alluded to on the official website, there are several advantages to having a cartridge-based system, as opposed to a digital-only gaming machine:
- no installers, no game updates, no logins, no Internet, no nagging notifications, no DRM, no complex menus, no BS: just get straight into the action
- best performance for your games, since there’s no desktop environment and no software clients running in the background eating up your computer’s resources
- preservation: you own the game for as long as you own the cartridge that runs it
- ease of use for those who are technically challenged
- better parental control over what games their kids can or can’t play
There are, however, a few caveats that you should be aware of:
- the initial groundwork, such as setting up a cartridge, takes a bit of effort and some know-how
- because of the DRM-free nature of Kazeta, some existing games in your library may not work, such as games with Denuvo DRM, or anti-cheat software
- some games will have the D-pad inverted
- unless the game you’re playing has a built-in controller configuration menu, you have no way of customizing your controls
- some cartridges will fail to boot. The troubleshooting process for this is very tedious
Development of Kazeta is also very slow-paced. The initial release was back in August of 2025. There’s been a few commits to the Kazeta GitHub repository since then, but there hasn’t been any new releases.
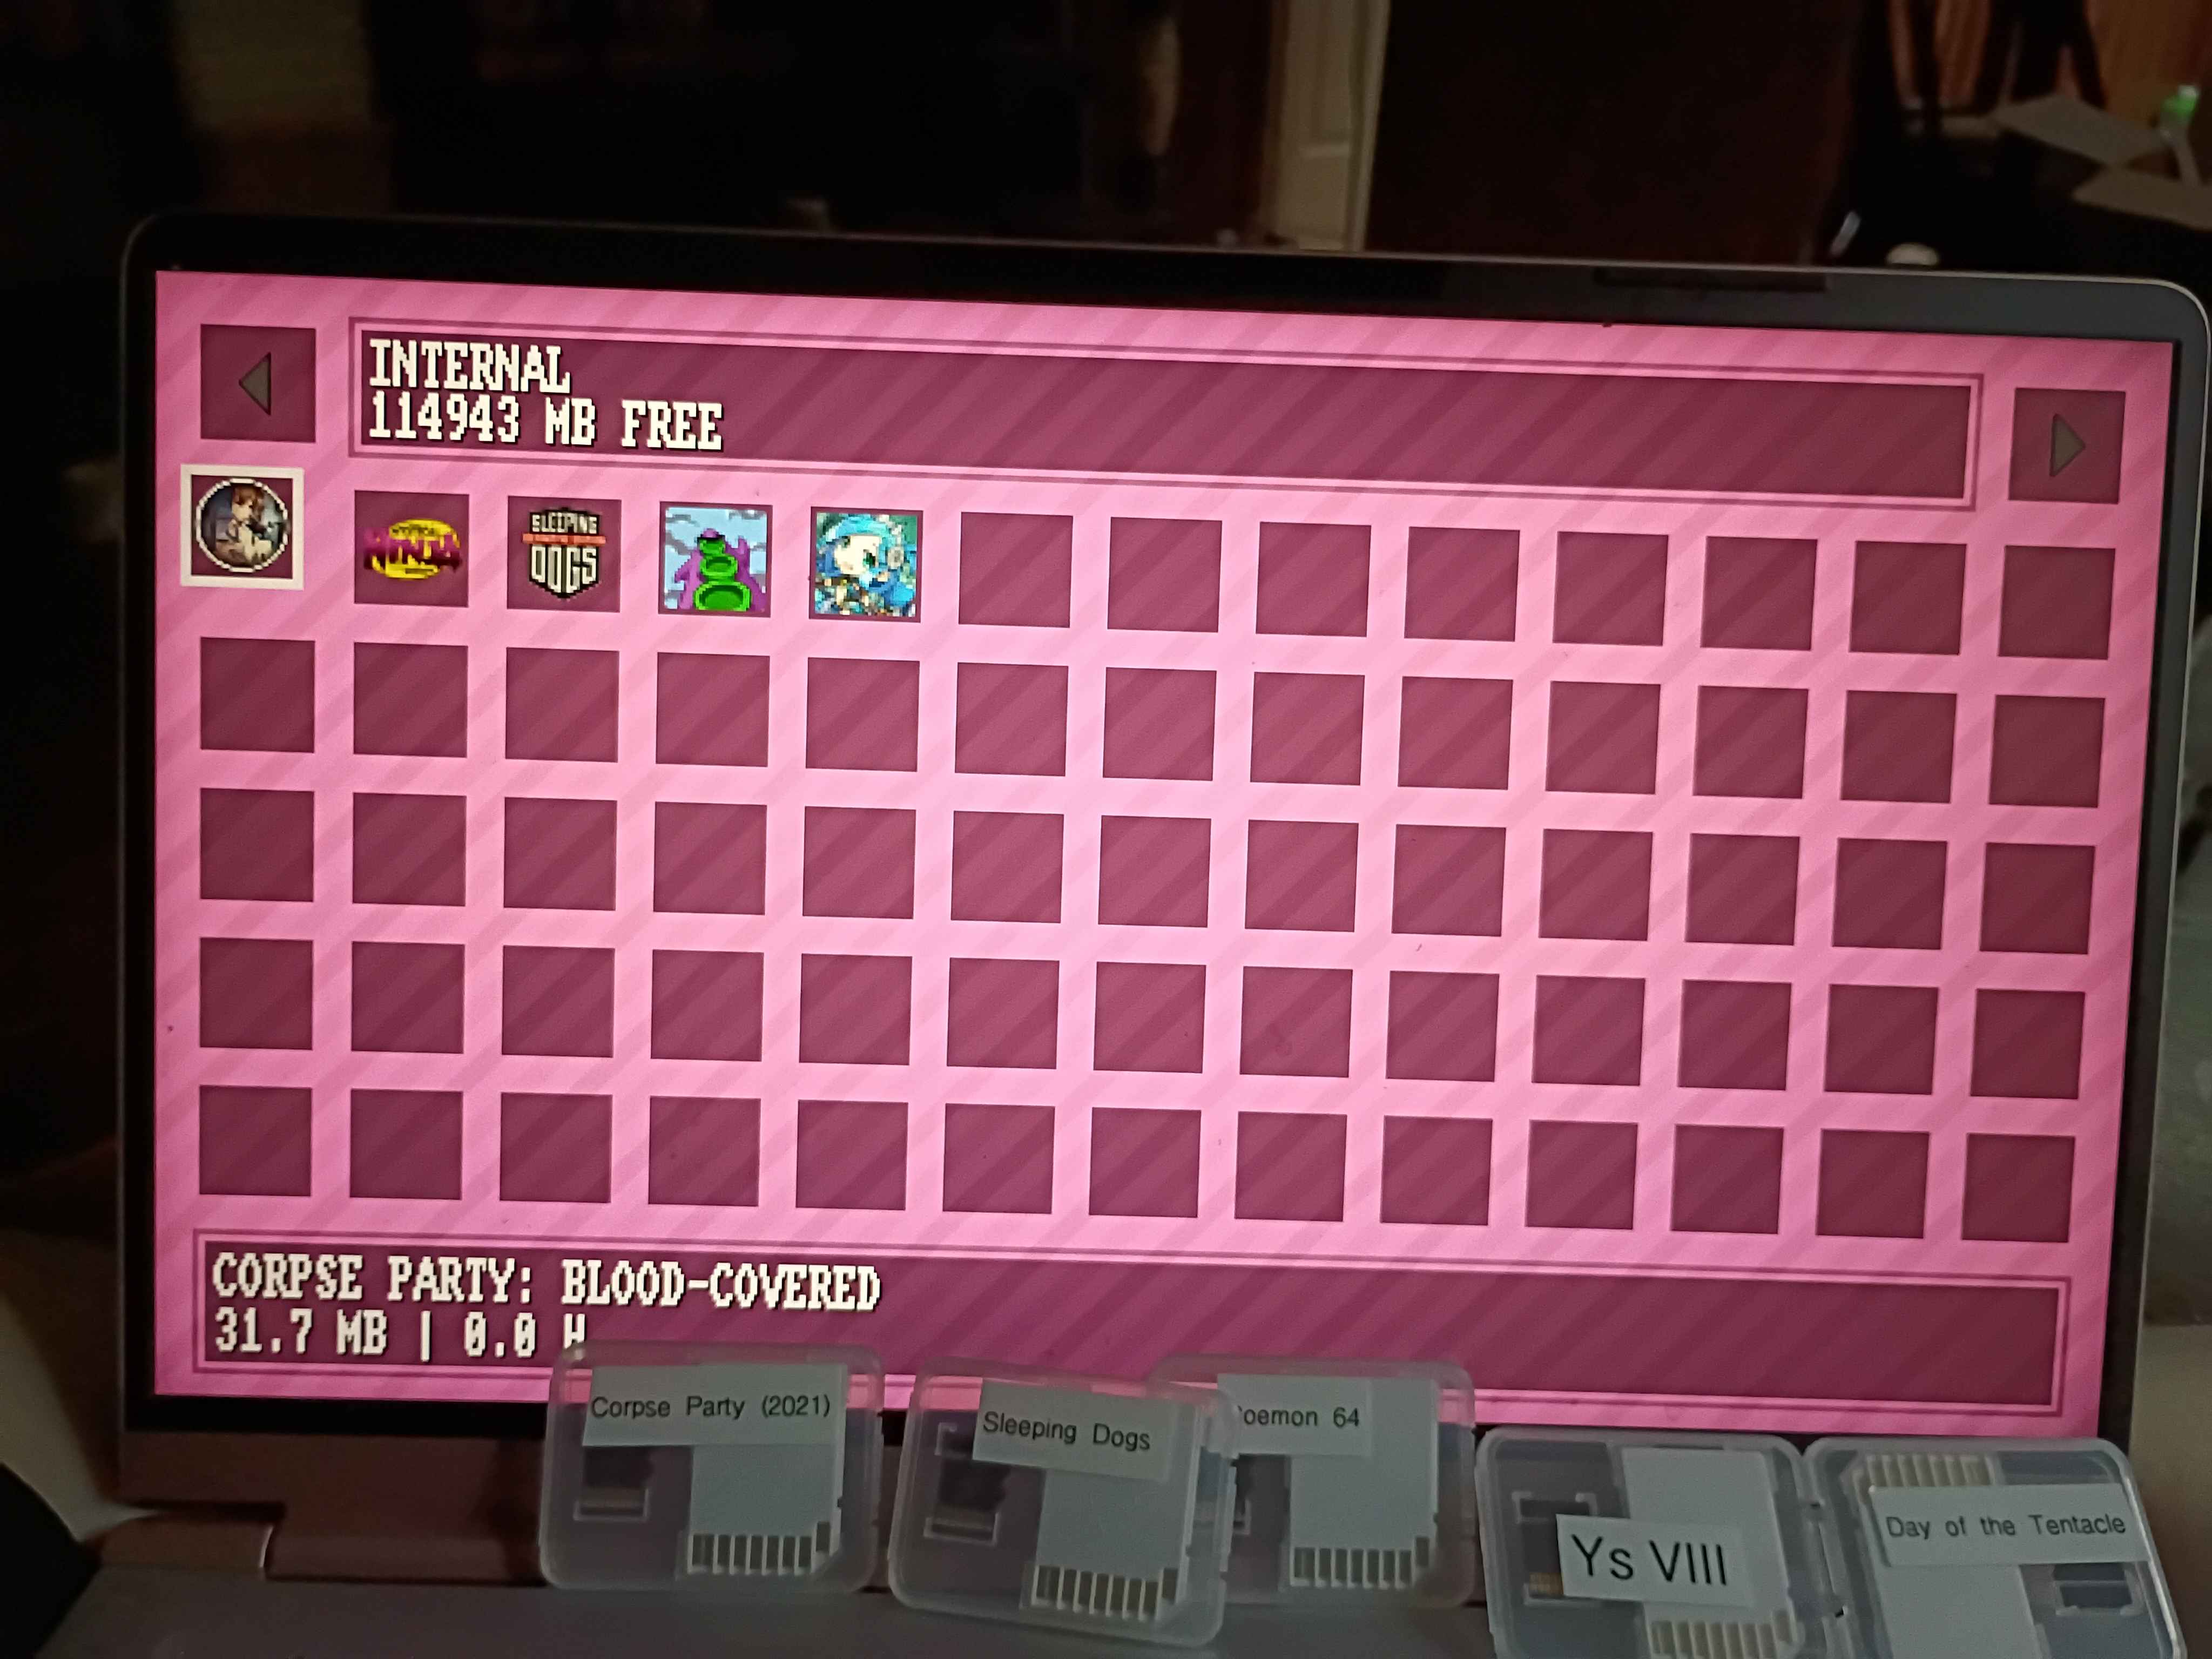 Image credit: Loratadine Niacin from the Kazeta Discord
The way I can think of it, is like this: Kazeta can be great for LAN parties, or bringing it over to a friend’s house. You might be tech-savvy yourself. You set up the system, set up the cartridges, and bring them over to a friend’s house. This friend of yours doesn’t need to know about the work that you did to set everything up. You just hook up the console to a TV, insert your controllers and your cart, turn the system on, and start playing. No downtime since there’s no logins, no updates to download. When you want to move on to another game, you just simply shut the system off, take out the cart, put a different one in, and turn it on again.
So, despite the work involved in creating cartridges, Kazeta is useful for simplicity and minimal downtime after the groundwork has been laid. People who hate technology will appreciate the work someone else did so that they can play the games that they want (for example, Alkazar’s Mom would have never played Tetris had it not been for Kazeta). Hopefully that makes sense.
Kazeta+ addresses some of the flaws of Kazeta, but for the sake of this tutorial, we’ll just focus on Kazeta.
What You Need⌗
Here’s what you’ll need if you want to set up a Kazeta console:
- a PC to download and flash the Kazeta ISO, as well as for setting up your carts
- a USB flash drive
- another PC that you’ll set up as your “console”. If said “console” doesn’t have an internal SD card reader, you’re also going to want to have a USB adapter for them if you want to use SD cards as cartridges
- a TV or monitor for said “console” (handhelds aren’t recommended)
- “cartridges”: this will be your physical media containing your games. This could be SD cards or USB flash drives. I recommend using SD cards so you can affix labels to them
- a keyboard and a controller
- your digital library of games – whether they’re from GOG, itch.io, Humble, Steam, Epic Games, etc. Note though that some games aren’t DRM-free. You can check PCGamingWiki for a list of DRM-free Steam games
Please note the following is not supported:
- hybrid graphics
- virtual machines
- dual-booting from the same hard drive
- secure boot/legacy/bios
- Intel Rapid Storage Technology (RST)
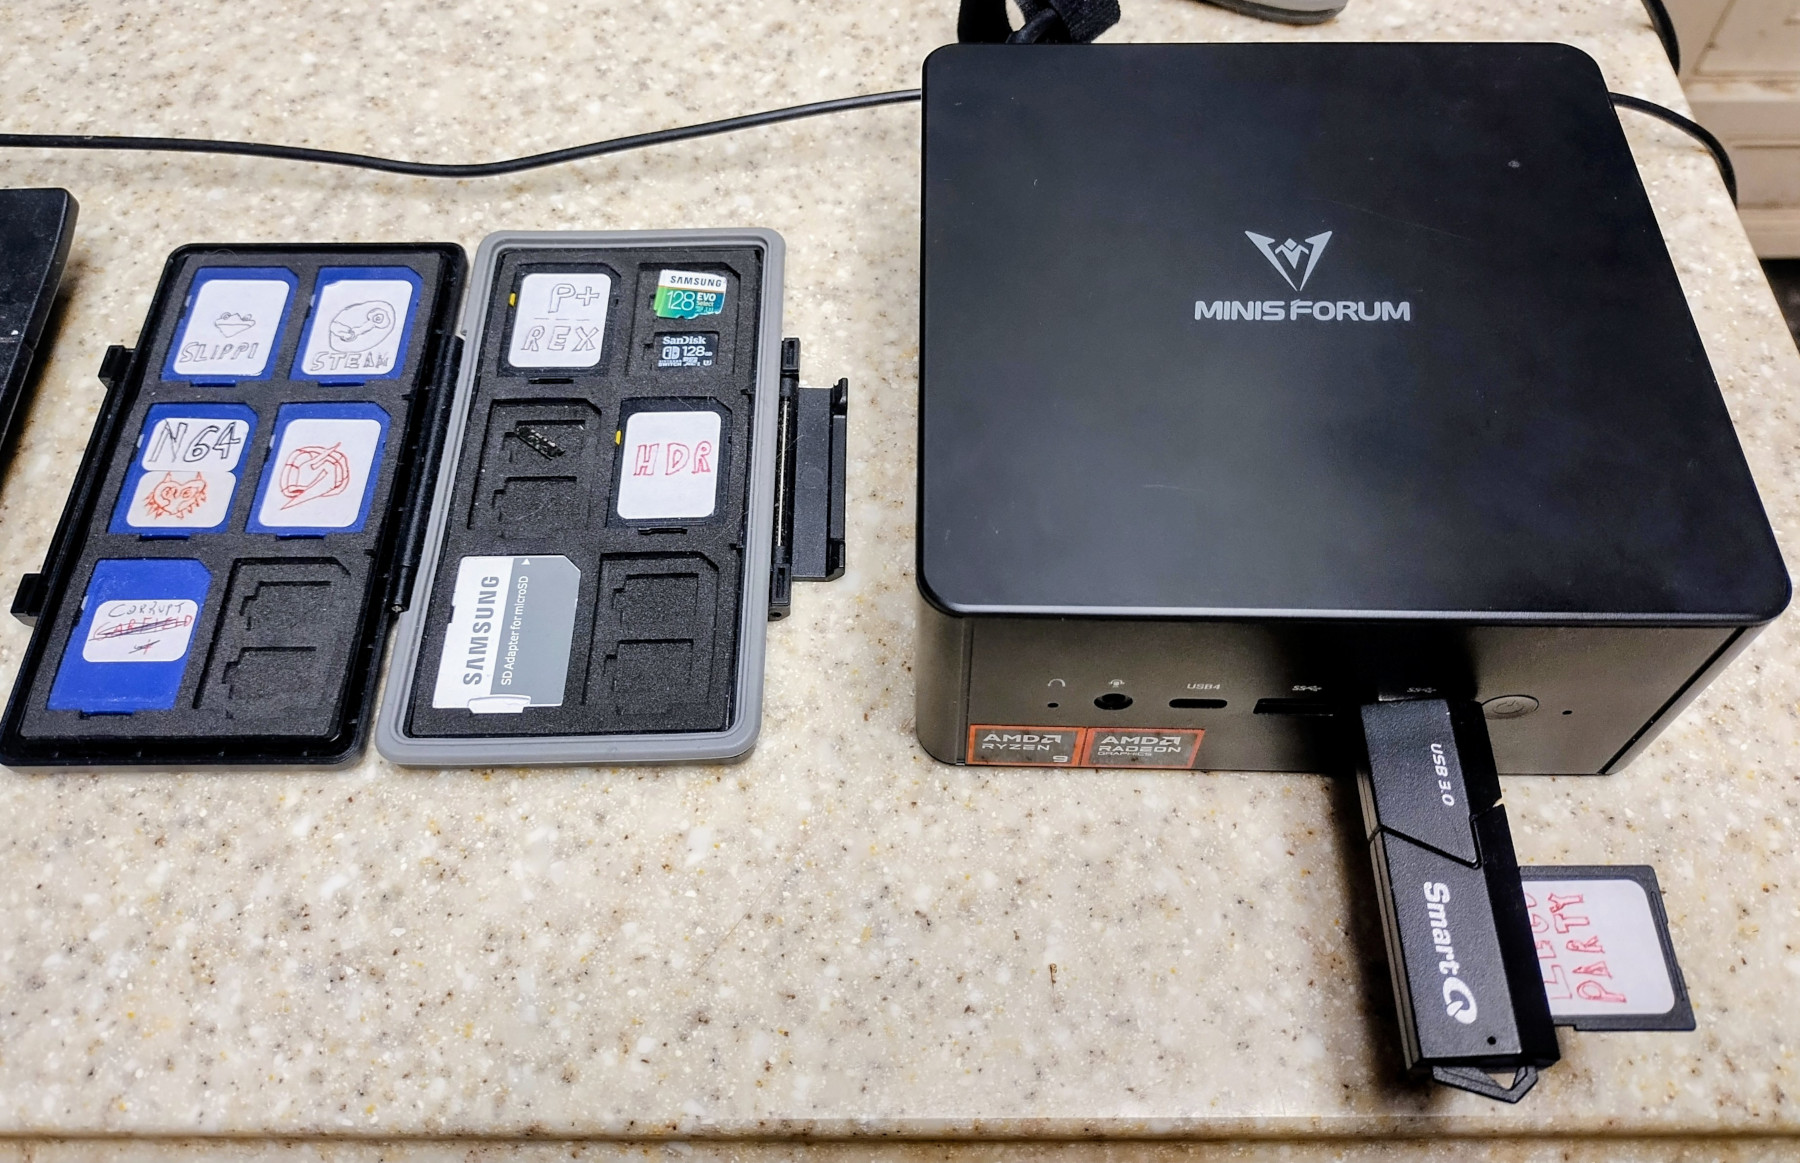
As far as the hardware requirements for your “console” are concerned, it’s fairly open-ended. It can be pretty much any PC that has at least 4 GB of RAM, 32 GB of internal hard drive space, and is no older than 10 years old. I personally am using the Minisforum UM890 Mini PC with 16 GB of RAM and 64 GB of NVMe storage.
I recommend using an AMD-based system, since generally AMD has the best compatibility with Linux. Obviously, the CPU and GPU are going to be dependent on the sort of games you want to play. AMD users will need a GPU that’s at least the Radeon RX 400 series or newer. On the NVIDIA side, the GPU needs to be from the GTX 1600 series or newer. Intel GPUs are reported as having “poor game compatibility”.
This guide assumes you’re using a Linux-based computer for setting up cartridges. Windows does not natively support formatting external media as ext4, which is the file system your cartridges will be using. You still can technically get through this guide by using workarounds for ext4 support on Windows, but I am not offering support for those of you who have issues along the way.
Installing Kazeta⌗
1. Download the ISO⌗
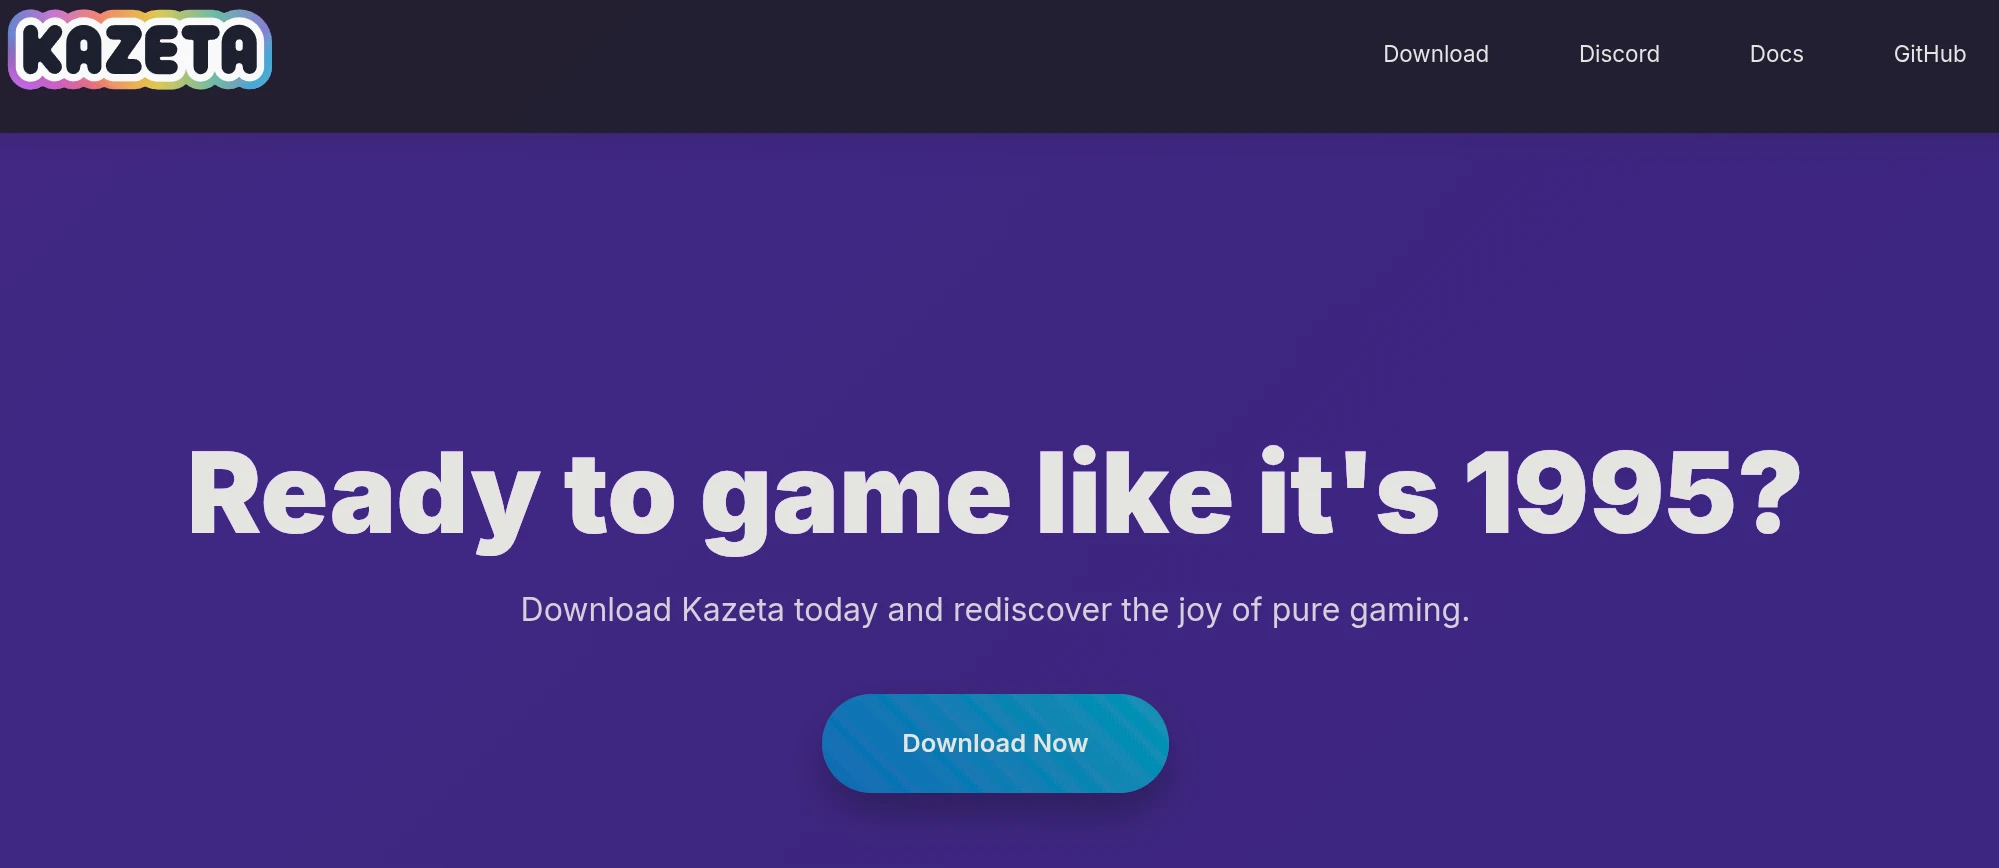
On your computer, head over to the official Kazeta website and click “Download”. That will scroll the page down to the “Download Now” button. Clicking said button will download the Kazeta ISO, which is about 2.5 GB in size.
2. Flash the ISO⌗
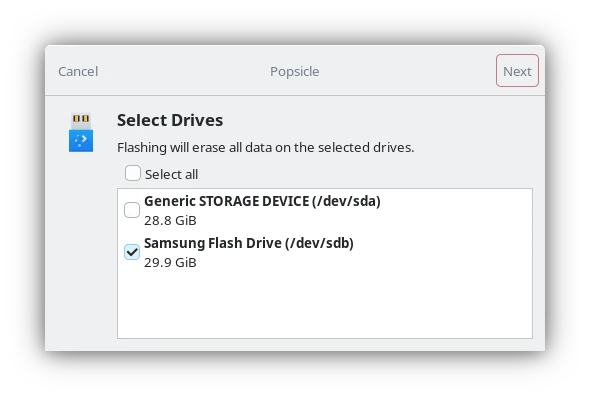
Insert your USB flash drive. If you’re using Linux, I recommend using Popsicle to flash the ISO, since it’s very easy to use. Otherwise, you can use Balena Etcher for cross-platform support. According to the Kazeta Wiki, Ventoy and Rufus are not supported.
Instructions for flashing the ISO are going to be dependent on what software you’re using. With Popsicle, simply select the Kazeta ISO, then select the drive you want to flash the ISO to. Enter your sudo password, then give it a few moments.
3. Install Kazeta⌗
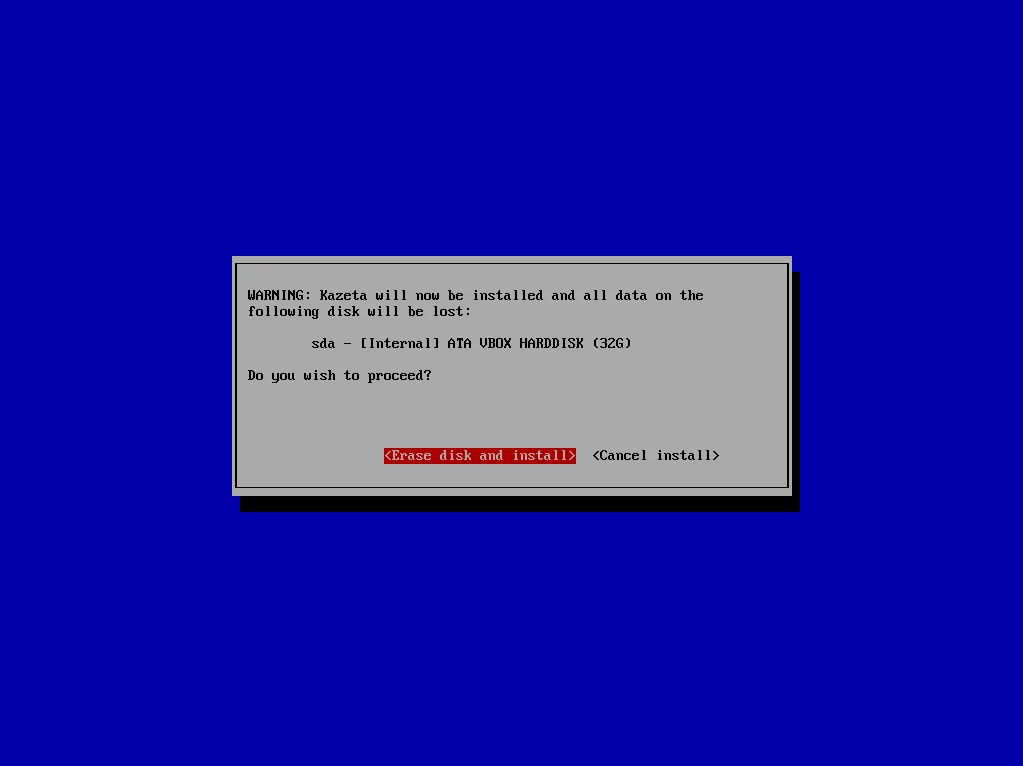
Once the ISO has been flashed, disconnect it from your computer and connect it to your “console”. Plug in a keyboard. Turn the “console” on and spam F7 (or F8, or whatever function key the “console” manufacturer set the boot menu to) during the BIOS splash sequence. Select your USB flash drive from the menu.
Installation of Kazeta is straightforward. If multiple hard drives are detected in your “console”, the installer will ask what disk you want to install Kazeta to. Otherwise, just proceed with the installation. You’ll get a warning that everything on the hard drive will be formatted and deleted. After a few minutes, once the install process is complete, reboot your “console”.
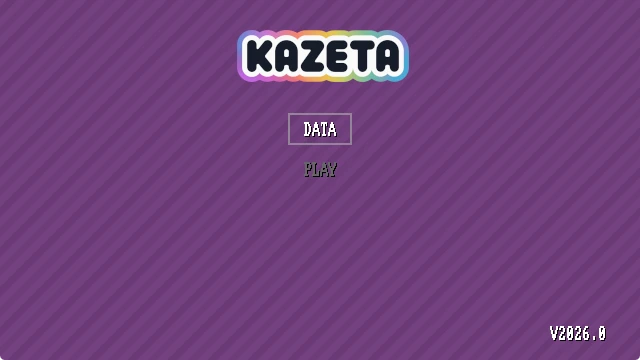
If everything went well you should be presented with the Kazeta BIOS. From here, you can insert your “cartridges”, whether they’re a SD card or a USB flash drive, and select the “PLAY” button to play them, or manage your save data in the “DATA” menu.
Creating Cartridges⌗
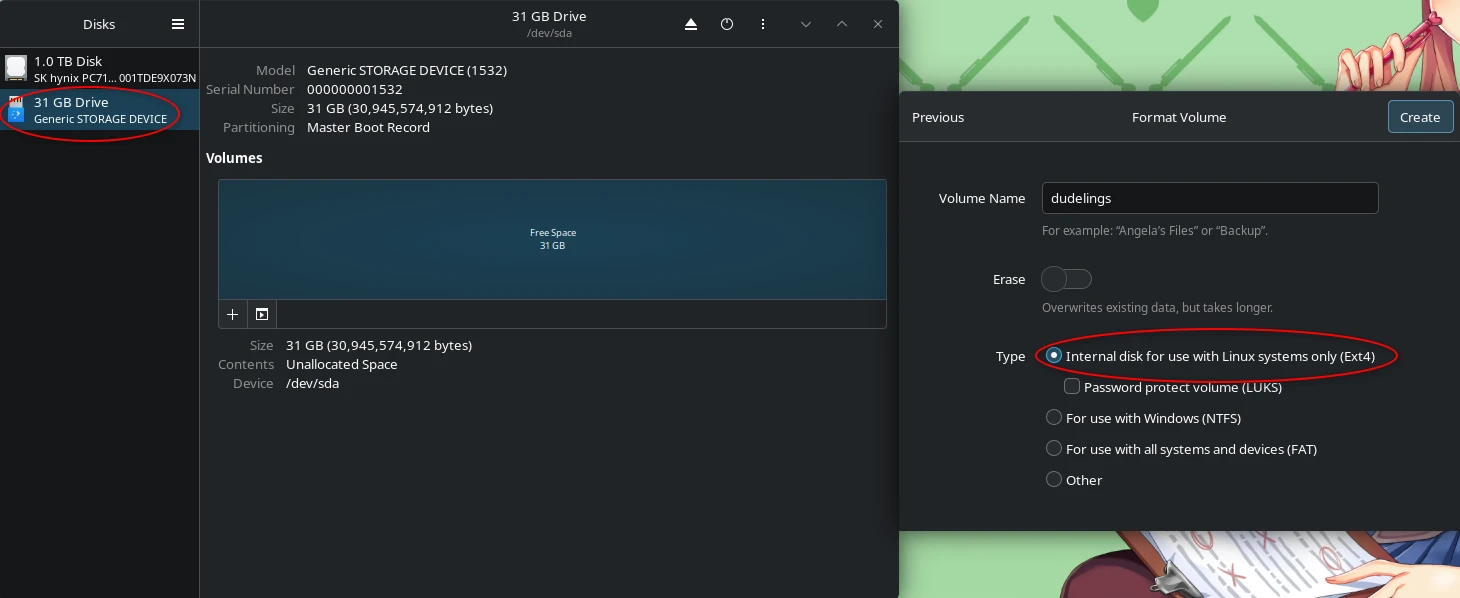
On your PC, connect your removable media. Formatting your removable media as ext4 is going to be dependent on what software you’re using. For example, if you’re using KDE Plasma, you would likely be using “KDE Partition Manager”. On GNOME, you’d be using “Disks”. When formatting, ensure casefolding is disabled. For the label name, don’t use any spaces or special characters.
Here you can see I’m formatting a 32 GB SD card with Disks, setting dudelings as the label name, and specifying the file system as ext4.
A Kazeta “cartridge” will have the following contents on it:
- the game itself
- a 32x32 or 64x64 PNG icon. This will be seen in the “DATA” menu when managing your save data
- a metadata file (
.kzi) that contains information for the cartridge, such as the name of the game, execution parameters, what runtime should be used, etc. - (usually) a runtime file (
.kzr) that gives the game the necessary dependencies in order for it to run. In some cases the game binary will already have all of the necessary dependencies for it to run (such as AppImages), so a runtime file isn’t needed
To give you an idea of how this would work, I will be walking through the installation of the Celeste 64 game cart provided on the Kazeta Wiki.
The Celeste 64 Sample Cart⌗
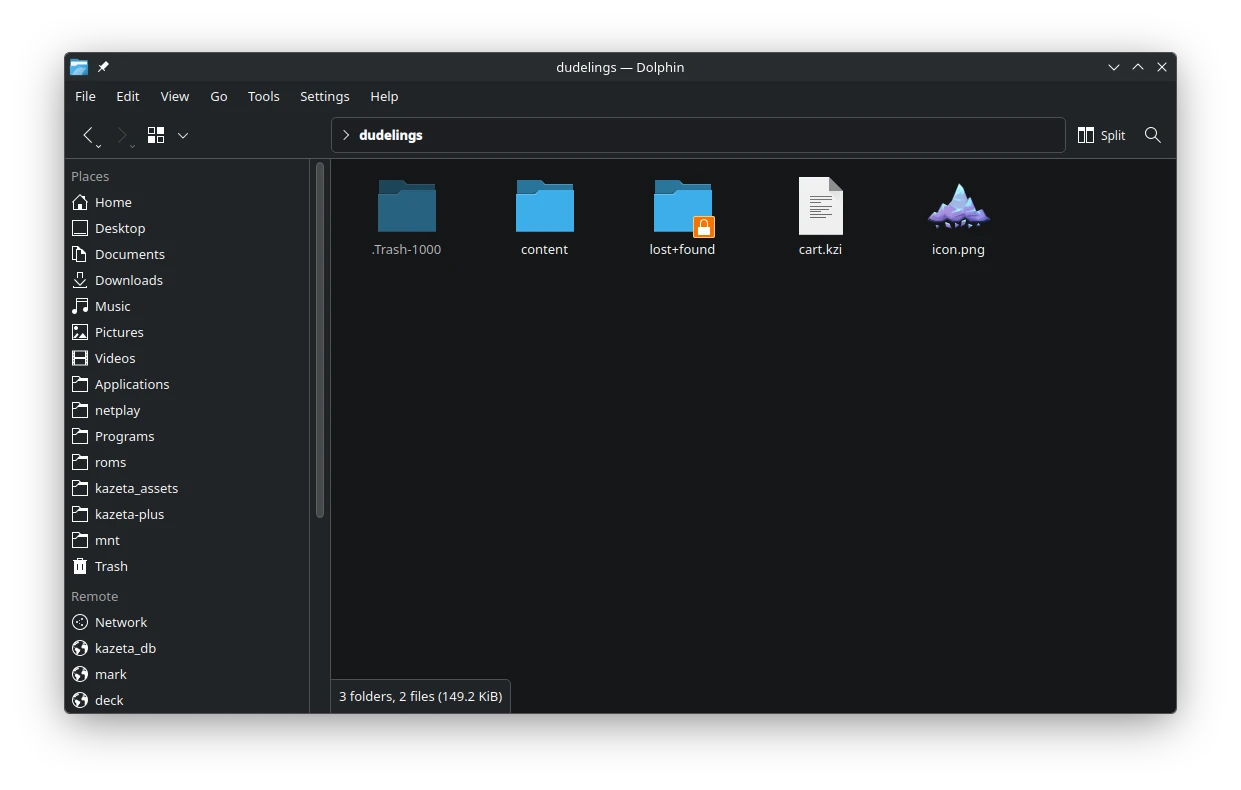
Download the Celeste 64 sample cart on the Kazeta Wiki. Both a native Linux version and a Windows version are provided. Simply extract the contents of the tarball to the root of your removable media. So the root of your removable media would look something like this now:
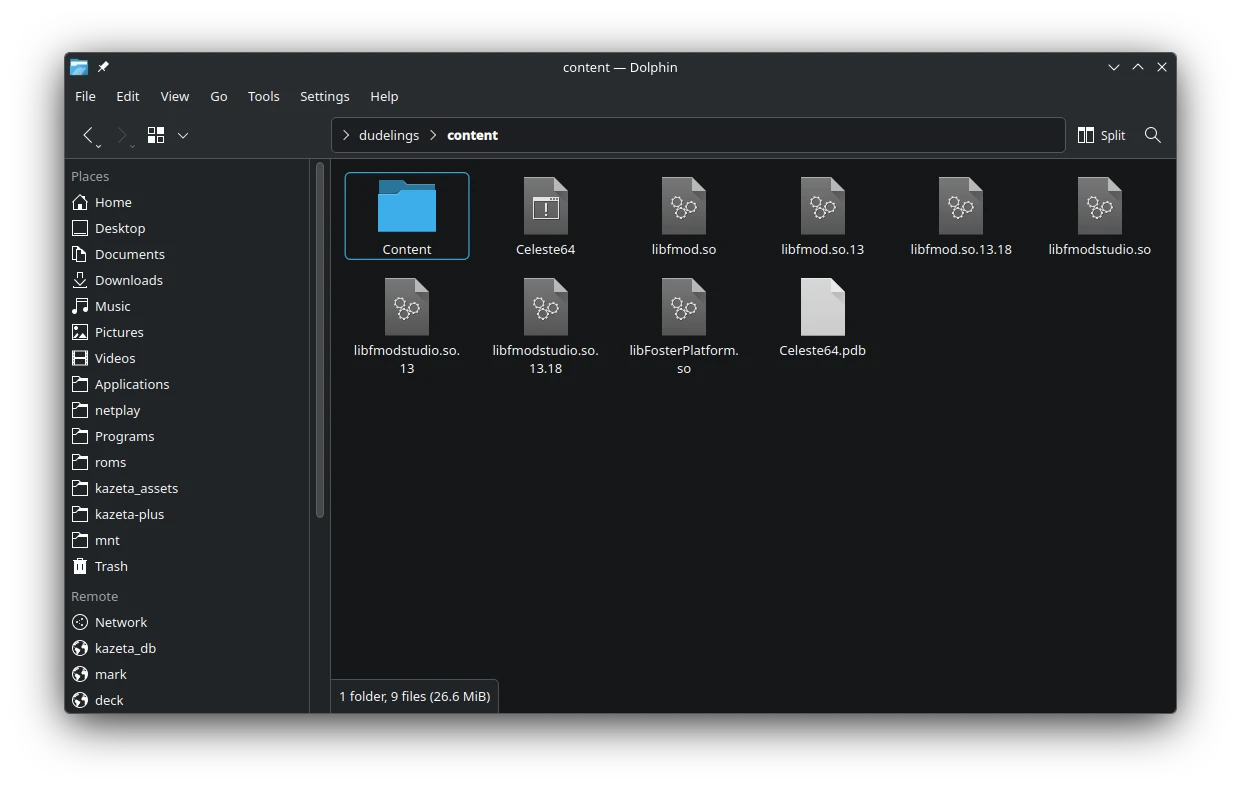
- a “content” folder containing the Celeste 64 game files
- an
icon.pngfile - a
cart.kzifile
Inside of the “content” folder we have the game files. Importantly, the Celeste64 binary.
Notice the contents of the cart.kzi file:
Name=Celeste 64
Id=celeste-64
Exec=cd content && ./Celeste64
Icon=icon.png
This metadata file defines the name of the game, the game ID, the execution parameters that direct what executable to run, and the icon file path.
If, on the other hand, you were to use the Windows version of the Celeste 64 sample cart, the cart.kzi file would look like this:
Name=Celeste 64
Id=celeste-64w
Exec="content/Celeste64.exe"
Icon=icon.png
Runtime=windows
Notice a few key differences:
- a “w” is appended to the game ID, to help us distinguish that we’re using the Windows version of the cartridge
- the execution parameters are encapsulated in quotation marks: this allows us to use spaces, if there are any in the executable file name
- a runtime file is specified. This is because we need to have the Windows runtime file stored on the removable media in order to run the game
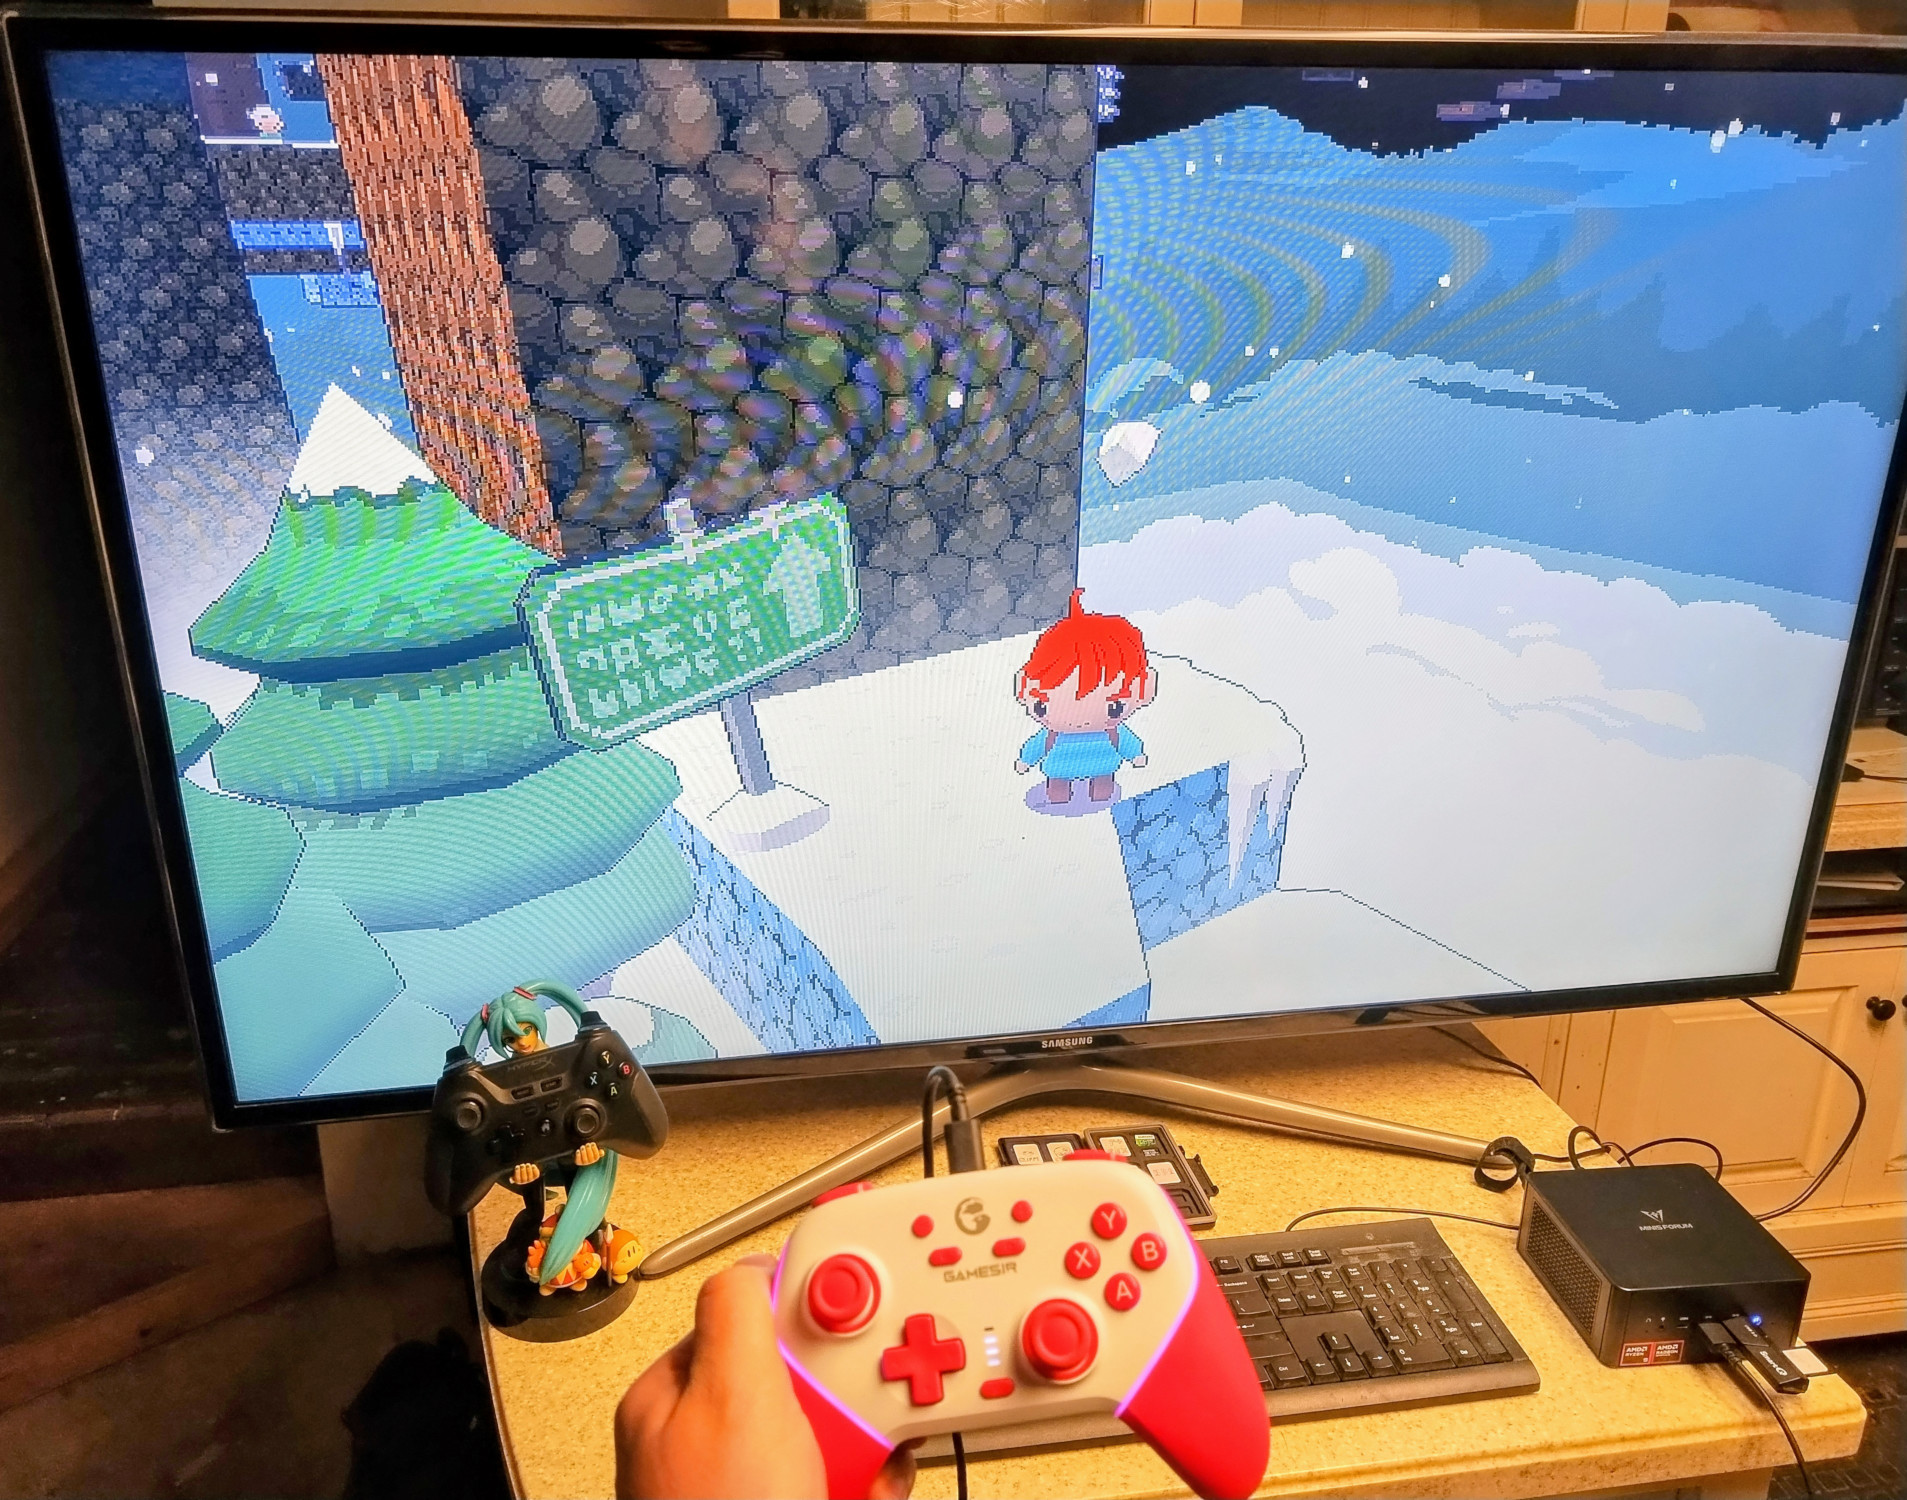
To run this game on Kazeta, all you need to do now is safely eject the cartridge from your computer, connect it to your Kazeta console, and select “PLAY” from the BIOS. Or just simply turn the console off, insert the cartridge, and turn the console back on. The console should instantly boot to the game!
Making Your Own⌗
But let’s say you wanted to make your own cartridge. In this guide, I will be walking through the process of creating a Dudelings cart, but the same principle can be applied for any other game.
Dudelings can be purchased either through Steam or itch.io. Dudelings is DRM-free, regardless of where you bought it. Once you’ve downloaded the game, copy the contents of it to your removable media. Next, we’ll need the Linux runtime, so download it from the Kazeta Wiki. Place the runtime to the root of your removable media.
We need an icon. An easy way of obtaining game icons is through SteamGridDB. Search for “dudelings” in the search bar. Click “Dudelings: Arcade Sportsball (2024)” in the search list. Click “ICONS”. We need to make sure the icon is 32x32, or 64x64, and is in PNG format. You can filter these results while browsing for the appropriate icon. If no icons are available with these specifications, you can use a tool like GIMP to convert it later on. In the case of Dudelings, there already is a 64x64 icon in PNG format. Select it, and click “DOWNLOAD”. From there, right-click the image in the new browser tab that opens, select “Save image as…”, then save it to the root of your removable media. I recommend setting the file name as icon.png, but this isn’t necessary. Just make sure it’s something easy to remember.
Finally, we need to create the .kzi (Kazeta information) file. Create a new .kzi file on the root of your removable media with a text editor. Make sure it has the following:
- the name of the game
- the ID of the game. Make sure this doesn’t have any spaces or special characters
- the path to the game binary
- the path to the icon
- the name of the runtime
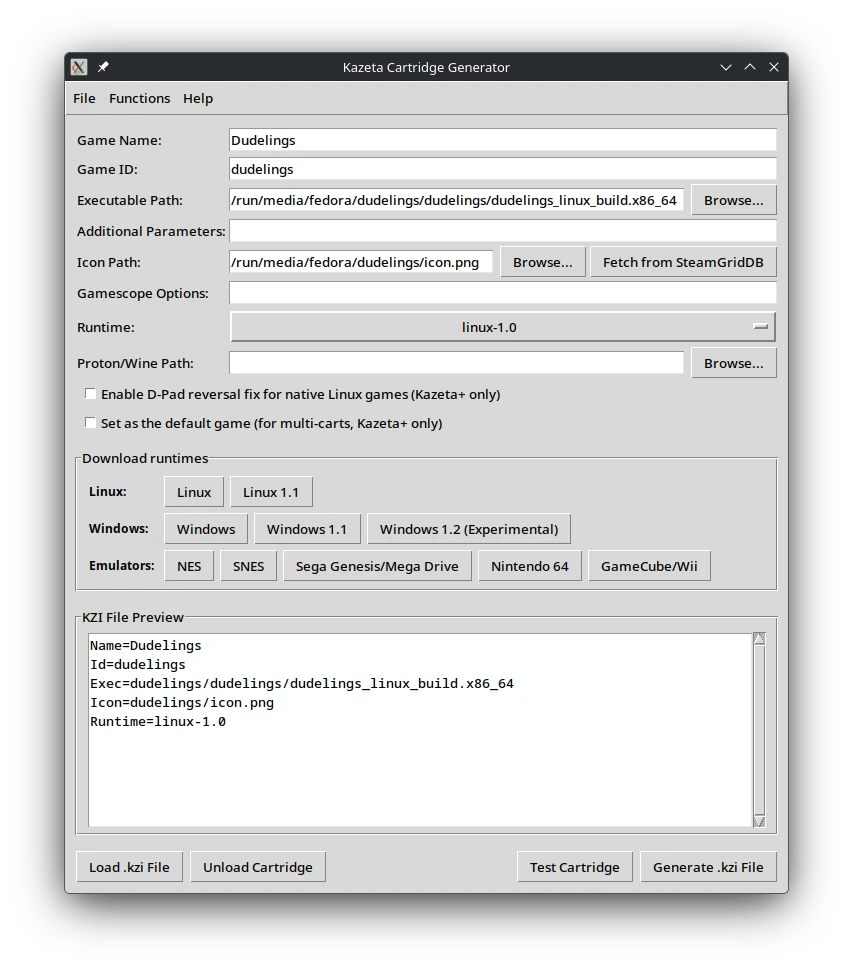
So, let me give you an example of what my dudelings.kzi file would look like:
Name=Dudelings
Id=dudelings
Exec=dudelings/dudelings_linux_build.x86_64
Icon=icon.png
Runtime=linux
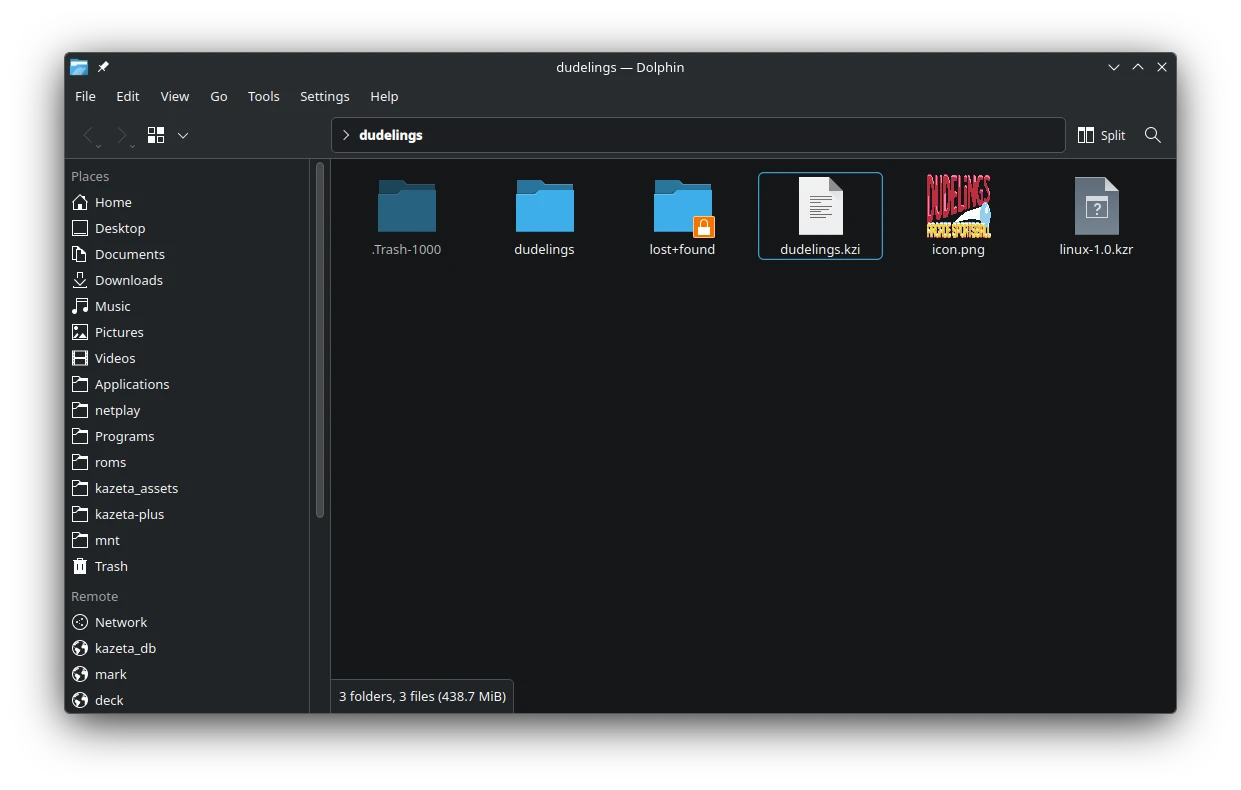
I have the contents of the Dudelings game inside of a “dudelings” folder. The .kzi, Linux runtime, and icon files are stored on the root of my removable media.
Create a Report (Optional but Recommended)⌗
Whether or not you have success running any particular game, the community would appreciate it if you add an entry for it on KazetaDB. Similar to ProtonDB, KazetaDB retains a database of community-tested reports on various games, and will tell you whether a game works out-of-the-box, needs some workarounds, or just straight up won’t run at all.

First, using the search bar, find out if the game you’re running has already been reported on. If not, you can log in to KazetaDB via your Steam account. Click “Submit Report” from the top-right, then start filling out the details to the best of your ability.
There’s a GUI for That⌗
If you’d rather not create the .kzi files by hand, there’s a tool that will make your life a bit easier: KZI Cartridge Generator. This application auto-types the game ID for you as you enter the Game Name, allows you to fetch icons for your games via SteamGridDB in just a few clicks, download runtimes directly through the user interface, test games locally before running them on your console, and a lot more. See the GitHub README for more details.
Decorating Your Cartridges⌗
To get that special look-and-feel if you’re using SD cards, you can affix custom labels to them. You can use a dedicated printing service for this and have the labels shipped to you. Or you could create your own using a printer and adhesive glossy photo paper. You can use a labeling template, such as the one Avery or OnlineLabels supply. Then when you’re done and have it printed out, you could cut the labels out with scissors, peel the adhesive off, and put them on the SD card. This will not only make it easier for you to distinguish which cart has which game, but also make your SD card collection look a lot more professional.
Discord user Calyder has provided some beautiful examples of what your cartridges could look like with jewel cases.
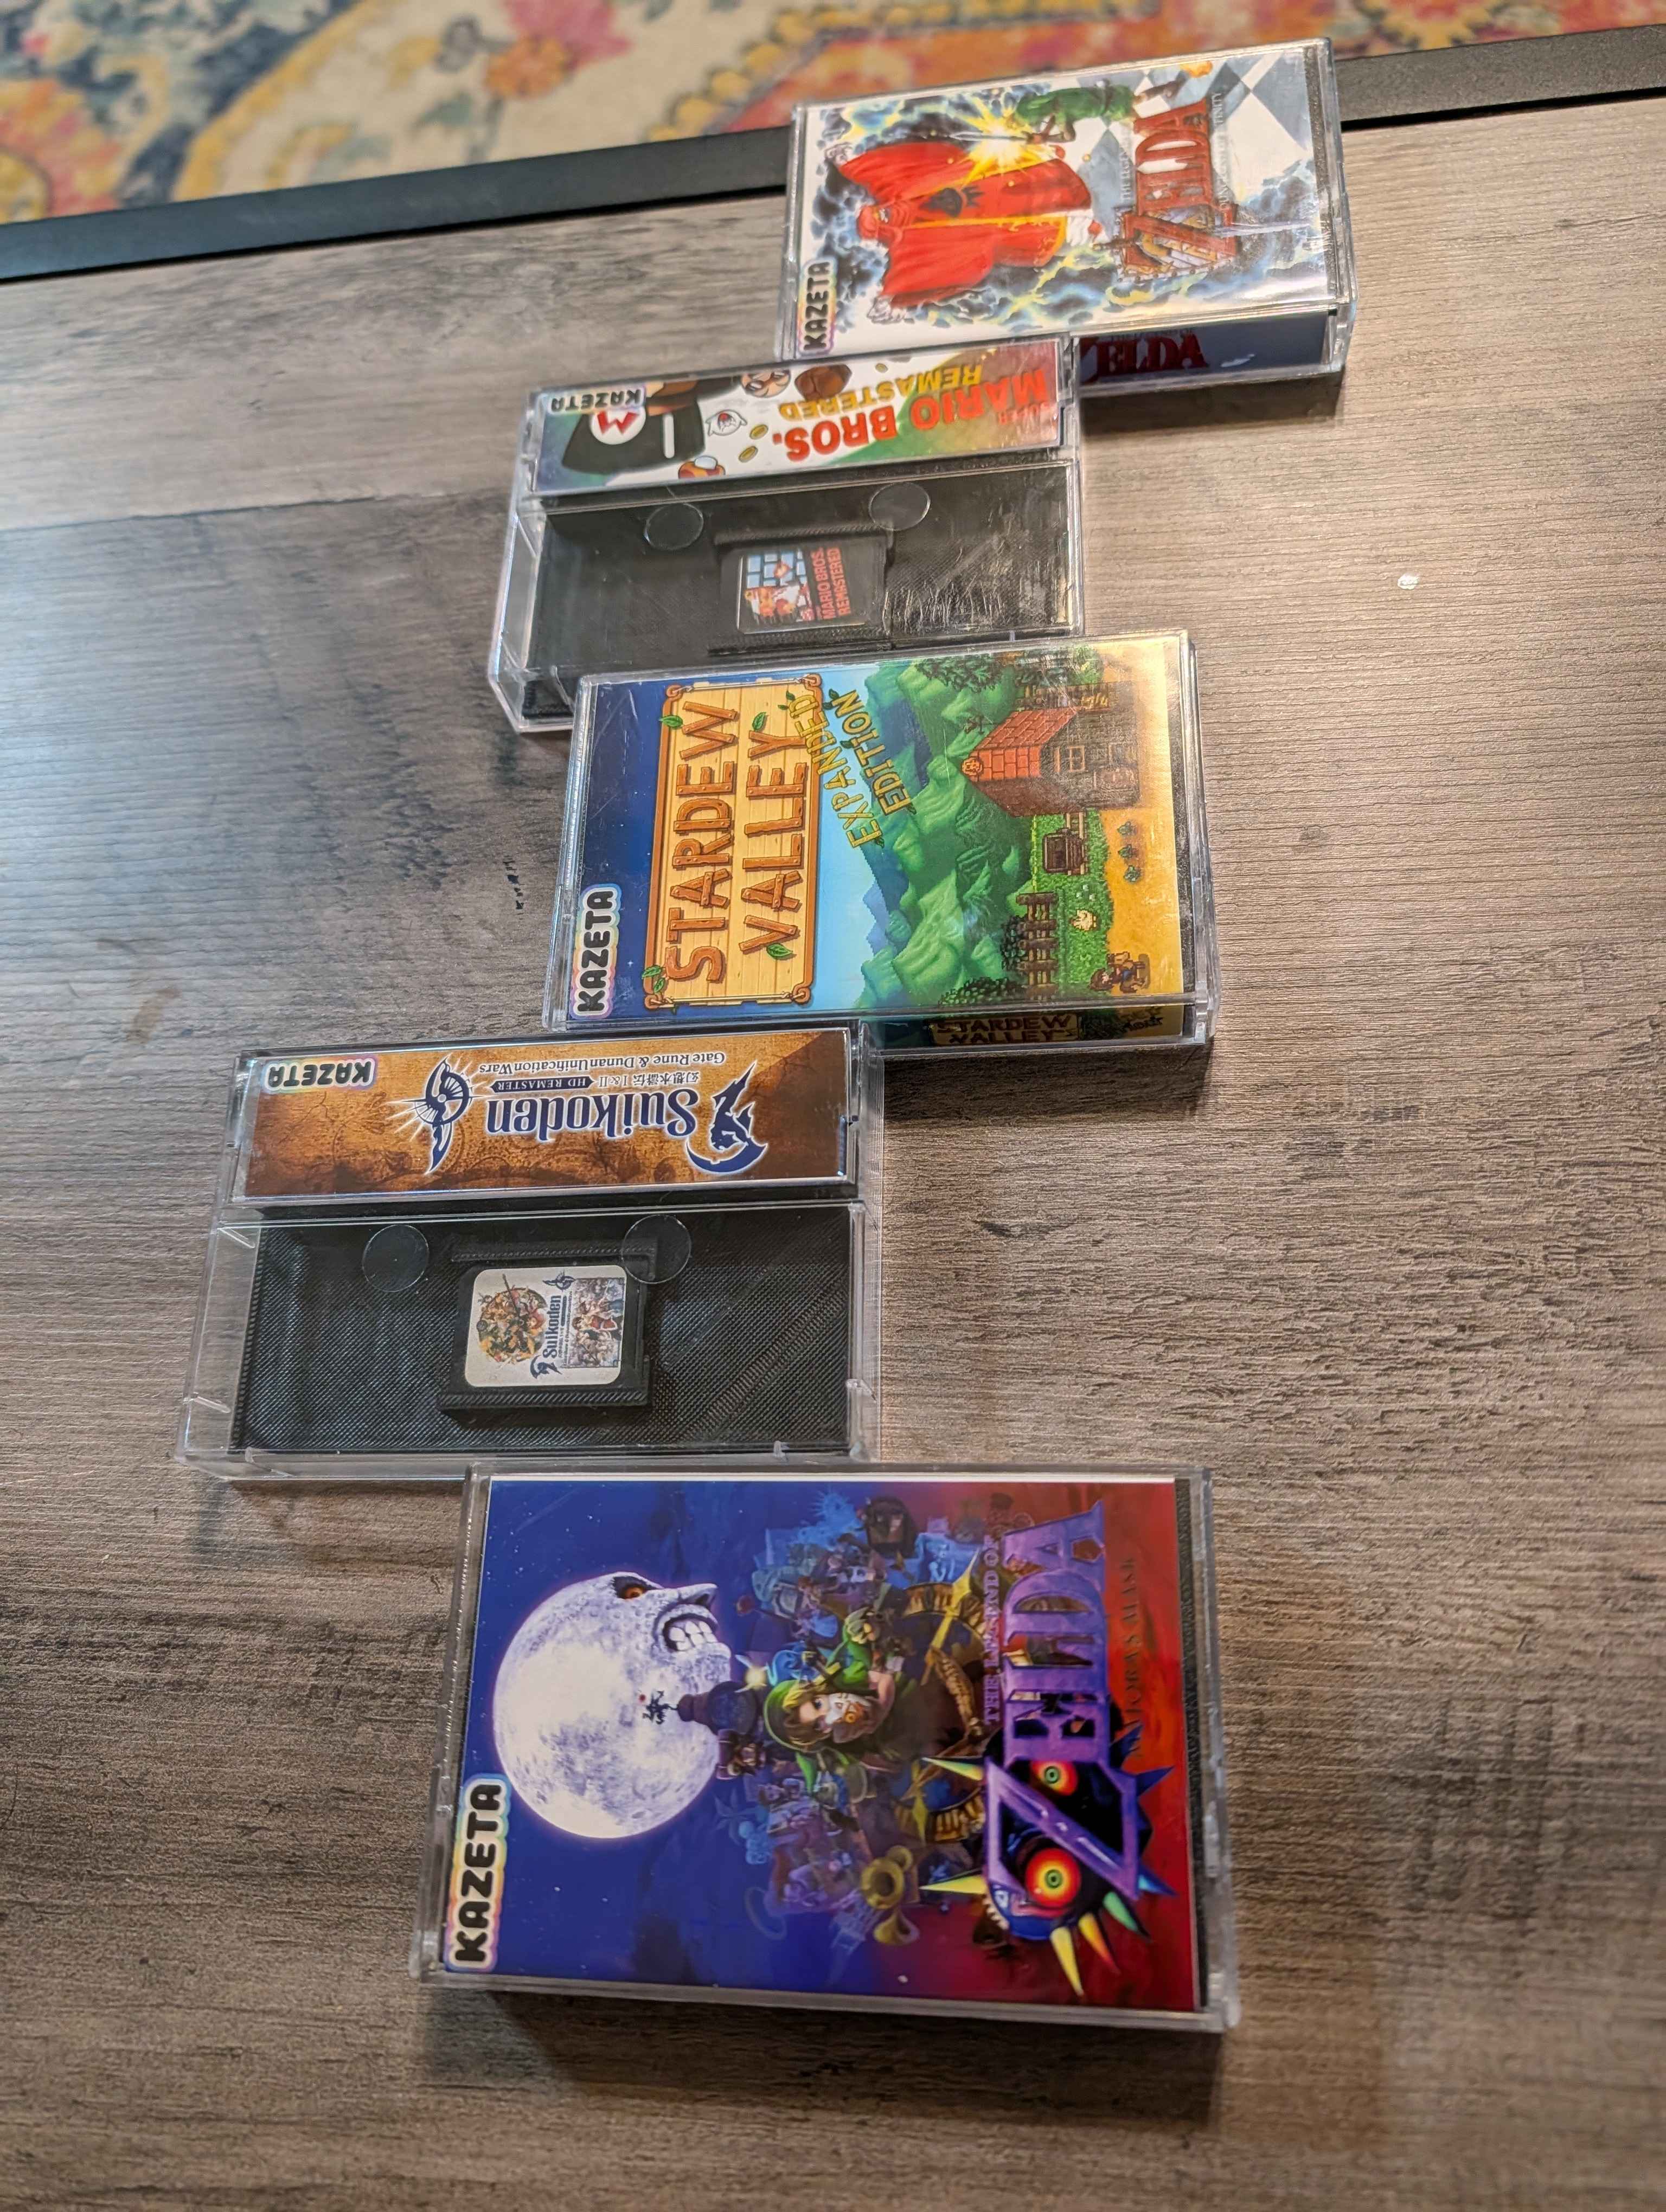 Image credit: Calyder from the Kazeta Discord
Troubleshooting⌗
There will likely be a game or two that just won’t work. If so, you can head over to the Kazeta Discord and create a post in the #help channel. We’ll try to help you out to the best of our ability. If you’d rather not use Discord, you can also file an issue on the Kazeta GitHub.
Cover image credit: Luke Short Cloud